Frugal Friday: Mead

There are many people who go all out on fancy equipment and supplies for brewing mead, but humans have been brewing mead with primitive equipment for thousands of years. I found this basic, foolproof mead recipe online years ago, although I cannot now find the site I found it on. It makes a very enjoyable mead with no equipment and very little cost. I will also mention a few variations that you can do, although I recommend starting with the basic recipe.

Shopping List:

  • One gallon jug of spring water
  • 2-3 lbs local, raw honey
  • 1 snack box of organic raisins (you may have to buy a pack of several snack boxes)
  • 1 pouch bread yeast (or 1 Tb of bread yeast if you already have some)
  • 1 balloon (you may have to buy a bag of several)

Instructions:

Open the spring water. Pour out 12oz of water (1.5 cups) for each lb of honey. Pour the honey, yeast, and raisins directly into the jug of water (a funnel helps). Cap the jug and shake vigorously. Poke a pinhole in the top of the balloon. Uncap the jug, and stretch the opening of the balloon over the mouth of the jug. Set somewhere to ferment.

After a day or two, your balloon should stand up. after 10-14 days, the balloon should flop back over. When this happens, take the balloon off, recap the jug, and shake vigorously. Replace the balloon. The balloon may stand up again. If so, wait another day or two after it flops over again, and then pour your mead into glass bottles or jars. You can use a coffee filter or cheesecloth to strain out the raisins and yeast, although most of the yeast will have settled to the bottom and can be avoiding by pouring gently and not fully emptying the jug. Seal the bottles. You may taste the mead at this point, although it will taste significantly better after conditioning in the bottle for 6 months to a year. The website I got this recipe from said that it gets even better if you condition longer, but I have never been able to let it go past a year.

Variations:

  1. Use the dregs from your homemade cider in the place of the bread yeast
  2. Use the apple peel method that I recommend for cider in place of bread yeast
  3. Add a cinnamon stick or two, a clove, and a star anise–Or whatever else you want to try
  4. Use only 1-1.5 lbs honey, pour out an additional 2 quarts of water, and add 2 quarts of apple or other fruit juice.

Let me know how you like your results!
Frugal Friday: Laundry Soap

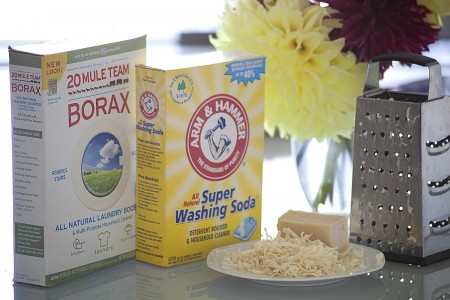
I found this picture on the internet

I made my own laundry soap once or twice before I got married using this recipe. After we got married, Courtney began using this recipe as well, and has been making her own laundry soap ever since. After she taught herself to make her own bar soap using lard, lye, and water, she stopped buying Fels-Naphta and began using her own bar soap. This results in a totally unscented laundry soap, while the Fels-Naphta gives a nice subtle piney scent.

Here’s the recipe:

1 box of Borax
1 box Super Washing Soda
1 box Baking Soda
3 bars of Fels-Napha soap, shredded on a cheese grater, OR 1 lb grated homemade soap

Mix well in a large bowl or tub, then portion into smaller containers (Mason Jars work well). Use 1-2 tablespoons per load. Mason Jars of laundry soap that sit for a long time before use may have the soap shreds settle to the bottom, in this case shake or mix well before use.

Some blogs say that homemade laundry soaps don’t clean well, destroy laundry machines, or leave a soap residue in clothes. None of these are necessarily true, however, there are a few tips that you should use with this recipe.

First, fill the fabric softener compartment with white vinegar. Second, always use the warmest water and longest cycle suitable for the fabric. Third, always use the extra rinse cycle. Here’s why you want to do these things:

Why should you add vinegar to the fabric softener compartment? Because your clothes likely have a lot of bacteria on them. These bacteria create smells, which are masked by the artificial fragrances in your commercial laundry soap. Without the masking of artificial fragrances, you can get a musty smell in your clothes from this bacteria. The vinegar will kill these bacteria and fight the odor at the source, rather than just masking it.

Why should you use the warmest water and longest cycle suitable for the fabric? Because the soap shreds need to be completely dissolved in order to get maximum cleaning. Also the Borax cleans by soaking, so the longer the clothes soak in the Borax, the better. Hotter water dissolves the soap faster, meaning that it is dissolved for more of the cycle.

Finally, why use the extra rinse? This is to ensure that the soap is fully rinsed out. If the soap doesn’t dissolve fully until partway through the cycle, it may not rinse out fully with the normal rinse cycle. The extra rinse makes sure that all soap residue is rinsed out. we haven’t used a commercial laundry soap in over three years, and are still happy with our economical and effective laundry soap.

Frugal Friday: Cider

Today’s Frugal Friday post is a quick, easy, and cheap way to make your own cider.

Here’s what you will need to get started:

  • 1 gallon of preservative-free apple juice. Check the ingredients. If there is anything in it other than apple juice and citric or absorbic acid, find a different brand.
  • 1 gallon of spring (not purified) water. (Not necessary if the apple juice comes in a 1-gallon jug)
  • 1 bag of organic granny smith apples (Organic is necessary to ensure that the natural apple yeast is alive)
  • 1 balloon
  • 1 pin or needle

When you’ve got everything together, dump out the water. Remove the apples from the bag and peel them. Do not wash them beforehand. Place all the peelings in the empty gallon jug. Next, fill the jug with juice to about 1″ from the mouth. Use the needle or pin to poke a hole at the top of the balloon, and then place the balloon over the mouth of the jug. Set the jug on the counter where it will be out of the way.

In 1-2 days you will notice that the balloon is standing upright and there are bubbles rising in your juice. From this point, count off one week. If you want to vary the alcohol content of your cider, you can increase or decrease this time on your second batch. Your first batch, you are going to brew for one week, because I said so.

When the week is up, remove the balloon and very carefully pour your cider into a different container. There will be a large amount of yeast sitting at the bottom, and you want to leave this as undisturbed as possible. Your cider is now ready to drink, but ideally ought to be chilled in the fridge first. The last pint or so of cider, containing all the yeast, you will pour off into a third container. To the yeast dregs add about a teaspoon of sugar, and then place it in the fridge as well.

When you are ready to make your second batch, remove the yeast dregs, shake it up to distribute the yeast, and place about 1/2 of a cup of the dregs in your gallon jug. Add juice to about 1″ from the mouth, and place a punctured balloon on as before. You do not need the peelings the second time because the point of the peelings is to provide yeast, and you now have a supply of yeast from the dregs. Pour about 1/2 of a cup of the fresh juice into the dregs, and place it back in the fridge for next time. Again, wait for the balloon to stand up, and then count off a week and your cider will be ready.

Frugal Friday: Shaving

I neglected to mention in the last Frugal Friday post that I have no intention of making this a weekly thing. I don’t want this to become the entire theme of the blog, and I don’t write often enough to do one of these every week without them taking over completely. So, these posts will be on the same unscheduled I-write-when-I-have-something-to-say schedule that all my other posts are on, except that instead of publishing them immediately like I do with any other post, I will schedule them to publish on the next Friday.

Anyhow, this week we will look at 3 ways to save money on shaving. If your job requires you to be cleanshaven, you probably spend quite a bit of money on shaving gear. Whether its expensive electrics that have to be replaced every year or two, bags of Bic disposables, or $20-for-2-blades Mach 3’s and Quattro’s, it adds up pretty quickly over time. This week we have a few options to help you save some cash, and maybe even get a better shave in the process.

1) Dollar Shave Club

Several of the guys I work with use this, and they all are extremely happy with it. If you like using a modern multi-blade contraption, but want to spend less on blades, this may be the option for you. They have 3 different monthly cost options, but all the guys I know who use this service choose the $6 a month option. I have never tried using their razors, but the guys I work with say the $6 option shaves very similarly to a Mach 3. For more information, check out their website.

2) Old-Fashioned Double-Edge Safety Razor

This is what I use most of the time at work. Blades are much cheaper than the multi-blade cartridges that modern razors use, and give a better, closer shave as well. Additionally, when a blade begins to dull, it can be stropped on a razor strop or leather belt, and is as good as new. I rarely strop a blade, because they only cost about 10 cents a blade and last for several shaves with no stropping. Even without stropping, a $1 pack of blades lasts me for well over a month. Plus I can pick up blades at any drug-store or Wal-Mart, unlike the Dollar Shave Club blades, so if I forget to pack blades for a trip it is no problem. If you want to get one of these, I recommend this inexpensive but high quality model by reputable manufacturer Feather. It’s what I use.

3) Cutthroat Straight Razor

The ultimate in cost-effective shaving. After a one-time purchase of a razor, hone, and strop, you will never again need to buy blades. Simply strop before each use, and hone once every year or two, and you are good to go. What’s more, you can hand that razor, strop, and hone down to your grandson some day. Plus, you get the ultimate in close shaves–there’s a reason barbershops still offer straight razor shaves. One thing to be careful of here is that many straight razors on the market today are not really designed for shaving, or are designed by people who have never shaved with a straight razor. If you are interested in purchasing a straight razor, I recommend a “sight unseen” razor from Whipped Dog Straights. You will get a vintage straight razor in good condition, honed, stropped, and shave-ready for $43. If that is too rich for your blood, you can also get a “sight unseen flawed razor” which is the exact same thing but with some cosmetic flaw that does not effect the shave, for $28. You simply won’t find a better price on quality straight razors.

While you aren’t likely to get as much monthly savings from re-evaluating your shaving equipment are you are from changing cell phone providers, little changes add up. If you are spending $20 a month on razor blades, it is definitely time to re-evaluate and move to a better alternative. Often, the latest and greatest technology is no better (or even worse) than the tried and true, time-tested item it claims to make obsolete. Even razors are prone to fads: I recently saw an add for a razor featuring the gimmick of a ball between the blade and the handle. Avoiding fads and gimmicks is a sure-fire way to save money, whether on razors or on anything else.

Frugal Friday: Cell Phones

A while back reader John R. asked me to do some posts on things that I have/like. Most of what I have I have because it saves me money. So I’m starting this series as a trial run. We’ll see how it goes. I’ve learned a lot in trying to reduce my expenditures as low as possible to pay off my debt, and I know that there are many others out there who are also paying off debt. Hopefully this series can help you cut costs and live better on less.

For the first Frugal Friday, we will look at two options for cell phone service that you may not have considered. As much as I hate the ubiquity of the computer-phone constantly in everyone’s hand, and the general inability of whole swaths of the population to go more than 3 seconds without checking their phones, cell phones are a necessity for many people today. My job requires me to be on-call any time I am not at work, and I know that I am not alone in that requirement. Plus, I try to call my parents every weekend, so like it or not, I need a phone. I tried a number of different options, but even the mainstream pre-paid services cost about $50 a month, which was too rich for my blood. Now I pay just under $12 a month including taxes, and my service is just as good as when I was with the “big name” carriers. Believe it or not, service is available for even less than that a month. Let’s take a peek at two carriers you may not have considered, but that can save you some serious dough.

1) Republic Wireless

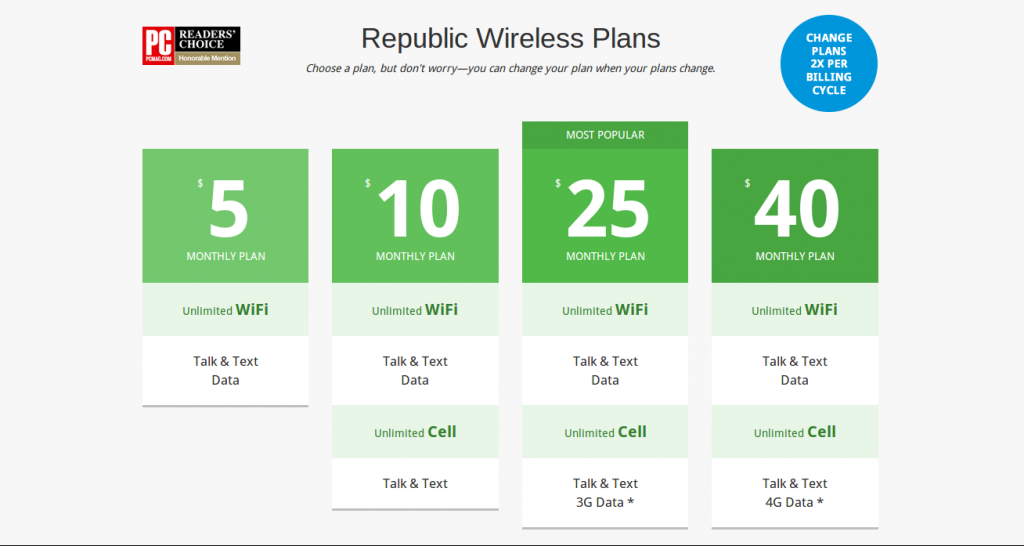
This is the service that I have. The unique thing about Republic is that when you are connected to wi-fi, the phone automatically routes your call via wi-fi rather than cell signal. I wasn’t sure how the quality would be, but it turned out to be excellent. If you walk out of wi-fi range, the call seamlessly transfers to cell. I can’t even tell when it happens. For me, the advantage of Republic is that when I am out of the country, I can still make and receive calls on my phone as long as I am connected to wi-fi. I also like the option for unlimited talk and text without paying for mobile data. To me, a phone is for talking on, and if I need to use the internet on it, I can go to a coffeshop or somewhere and connect it to wi-fi. Plans are listed in graphic below, and more info is available on their website.

2) Freedompop Wireless

I have not used Freedompop’s wireless service, but I do use this company for my internet, which is through a combined cellphone reciever/wireless router. The internet service is good, and I have had no complaints with the company. If you’re leery of having some of your calls routed over wi-fi, Freedompop may be right for you. This is a strictly traditional cellphone service, although of course you can still connect to wi-fi in order to not use mobile data if you need to use the internet or an internet-based app like BibleGateway’s audio-Bible app. What I like best about Freedompop is they offer one year of unlimited talk, unlimited texts, and 500mb data/month for just under $7 a month, or a total of $80. That one year of service is less than what you are going to pay for a month of service on any of the “big name” providers.  Also, if you don’t use your phone much at all, you can get 200 minutes, 500 texts, and 500mb data/month completely free (although you still have to buy the phone). Plans are listed in graphic below, and more info is available on their website.

If you need to lower your cell phone bills, check out these two providers. If you know of another provider that should be mentioned here, let me know. I will expand this post as needed. Also, if you would like anything in particular addressed in an upcoming Frugal Friday, let me know and I will see what I can do.